Kubernetes部署Hoppscotch Community Version平替Postman
官方文档:https://docs.hoppscotch.io/documentation/self-host/community-edition/getting-started
1. 创建namespace
kubectl create ns hoppscotch
2. 我使用的是cert manager自动生成ssl证书,所以需要在这个新那么space当中,创建cloudflare api token 和 issuer
3. 创建certificate
创建Hoppscotch需要1个subdomain因为我开启了subpath。 如果你的enableSubpathBasedAccess是false的话就需要3个domain了
apiVersion: cert-manager.io/v1
kind: Certificate
metadata:
name: hoppscotch-cert-tls
namespace: hoppscotch
spec:
dnsNames:
- hcbackend.pangzai.win
secretName: hoppscotch-cert-tls
issuerRef:
name: letsencrypt-dns01
4. git clone 这个helm charts , 我是从官方copy出来的,然后修了一点bug,因为官方提供的service和deployment无法连接,所以我修了,使用我提供的helm charts就好。
官方HelmCharts : https://github.com/hoppscotch/helm-charts
git clone https://github.com/rudian/hoppscotch-helm-charts.git
5. 去到这个path内
cd hoppscotch-helm-charts
6. 修改your_config.yaml 到你自己的参数,你也可以参考原版的yaml。我的版本是设置了SSL的
必须设置email,因为一开始登入只能使用email发送的方式来登入。
原版的yaml路径:hoppscotch-helm-charts/blob/main/charts/shc/values.yaml
注意:原版yaml的例子就是关掉了subpath,所以才需要3个不同的domain
如果你想要desktop app要使用的话,那么enableSubpathBasedAccess就必须是true(必须开启subpath)
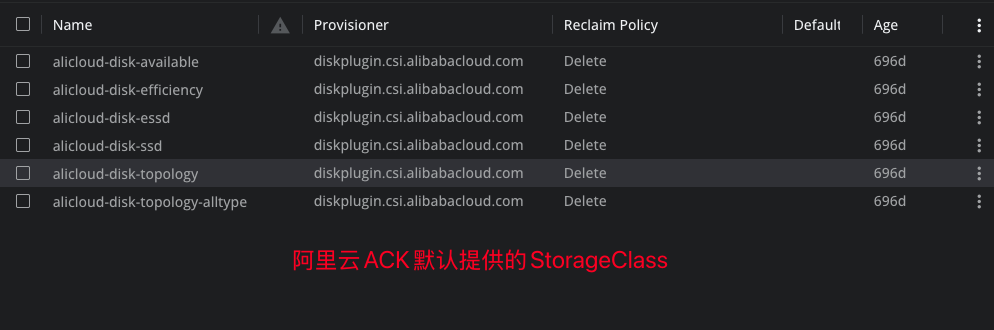
关于postgres的storageClass由于我使用的是阿里云的ACK,所以默认有好几种storageClass可以选,而且最低起步必须是20GB。

# Global settings for the application
global:
externalIP: "0.0.0.0" # Example: "192.168.1.1"
namespace: "hoppscotch" # Example: "hoppscotch"
# Community-specific settings
community:
replicas: 1 # Example: 3
image:
repository: hoppscotch/hoppscotch
tag: latest # Example: "v1.0.0"
pullPolicy: IfNotPresent
resources:
limits:
cpu: 500m
memory: 512Mi
requests:
cpu: 250m
memory: 256Mi
migration:
upgradeEnabled: false # If true, the migration job will run on every helm upgrade
config:
database:
external: false # Flag to use external DB, if false, it will use the internal postgresql created by the helm chart
url: "postgres://user:password@hostname:port/database?sslmode=require"
postgresql:
image: postgres:15
persistence:
size: 20Gi
storageClass: "alicloud-disk-efficiency"
database: hoppscotchCommunity
username: hoppscotch
password: hoppscotch123
mailer:
enable: true
useCustomConfigs: false
addressFrom: '"Buymall hoppscotch" <[email protected]>'
smtp:
url: "smtps://[email protected]:[email protected]"
host: "smtpdm-ap-southeast-1.aliyun.com"
port: "465"
secure: false
user: "[email protected]"
password: "Buymall9130X"
tlsRejectUnauthorized: false
rateLimit:
ttl: 60
max: 100
affinityEnabled: false
nodeHostnames: "node-1,node-2" # Example: "node-3,node-4"
authjwt:
sessionSecret: "dummySessionSecret"
jwtSecret: "dummyJwtSecret"
tokenSaltComplexity: 10
magicLinkTokenValidity: 3
refreshTokenValidity: "1d"
accessTokenValidity: "1d"
dataEncryptionKey: "data encryption key with 32 char"
urls:
base: "https://hcbackend.pangzai.win"
shortcode: "https://hcbackend.pangzai.win"
admin: "https://hcbackend.pangzai.win/admin"
backend:
gql: "https://hcbackend.pangzai.win/backend/graphql"
ws: "ws://hcbackend.pangzai.win/backend/graphql"
api: "https://hcbackend.pangzai.win/backend/v1"
redirect: "https://hcbackend.pangzai.win"
whitelistedOrigins: "https://hcbackend.pangzai.win/backend,https://hcbackend.pangzai.win,https://hcbackend.pangzai.win/admin"
auth:
allowedProviders: "EMAIL" # "GOOGLE,MICROSOFT,GITHUB,EMAIL"
existingSecret: ""
google:
clientId: "" # "dummyGoogleClientId"
clientSecret: "" # "dummyGoogleClientSecret"
callbackUrl: "" # "http://backend.example.com/v1/auth/google/callback"
scope: "" # "email,profile"
github:
clientId: "" # "dummyGithubClientId"
clientSecret: "" # "dummyGithubClientSecret"
callbackUrl: "" # "http://backend.example.com/v1/auth/github/callback"
scope: "" # "user:email"
microsoft:
clientId: "" # "dummyMicrosoftClientId"
clientSecret: "" # "dummyMicrosoftClientSecret"
callbackUrl: "" # "http://backend.example.com/v1/auth/microsoft/callback"
scope: "" # "user.read"
tenant: "" # "dummyTenantId"
community:
enableSubpathBasedAccess: true
links:
tos: "https://docs.example.com/terms"
privacyPolicy: "https://docs.example.com/privacy"
# ServiceAccount configuration
serviceAccount:
# Name of the ServiceAccount; if not set, defaults to "{{ .Release.Name }}-sa"
name: ""
# Annotations for the ServiceAccount (e.g., for AWS IRSA)
annotations: {}
# Example for AWS IRSA:
# eks.amazonaws.com/role-arn: "arn:aws:iam::${aws_account_id}:role/devops-${stage}-hoppscotch"
# Service configuration
service:
apiVersion: v1
name: hoppscotch-community
app: hoppscotch-community
# Dynamically set based on ingress
type: "{{ .Values.service.ingress.enabled | ternary \"ClusterIP\" \"LoadBalancer\" }}"
# Only set externalTrafficPolicy for LoadBalancer
externalTrafficPolicy: "{{ .Values.service.ingress.enabled | ternary \"\" \"Cluster\" }}"
ports:
backend:
port: 3170
targetPort: 3170
protocol: TCP
name: backend
frontend:
port: 3000
targetPort: 3000
protocol: TCP
name: frontend
admin:
port: 3100
targetPort: 3100
protocol: TCP
name: admin
subpath:
port: 80
targetPort: 80
protocol: TCP
name: subpath
selector:
app: hoppscotch-community
# Ingress Configuration
ingress:
enabled: true
mainHost: hcbackend.pangzai.win
className: nginx # nginx, alb, traefik
annotations:
kubernetes.io/ingress.class: nginx
nginx.ingress.kubernetes.io/ssl-redirect: "true"
service.kubernetes.io/load-balancer-type: "External"
cert-manager.io/issuer: "hoppscotch/letsencrypt-dns01" #使用cert manager的话就必须加上
# Example AWS ALB internal configuration
# alb.ingress.kubernetes.io/scheme: "internal"
# alb.ingress.kubernetes.io/security-groups: "sg-12345678"
# alb.ingress.kubernetes.io/certificate-arn: "arn:aws:acm:region:account-id:certificate/cert-id"
# TLS Configuration
tls:
enabled: true
secretName: hoppscotch-cert-tls
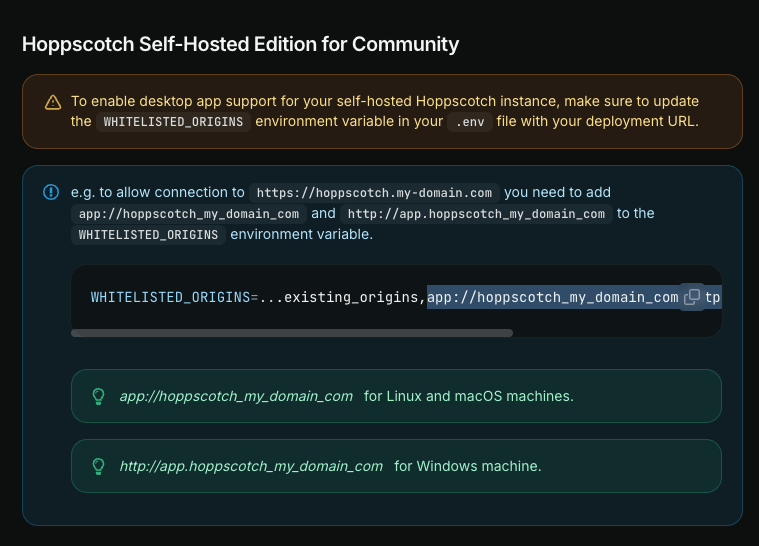
7. 修改完your_config.yaml之后就是在kubernetes cluster当中执行helm来安装Hoppscotch
如果没有附上最后的 ./your_config.yaml 那么程序就会拿原版的yaml
helm install community-hoppscotch ./charts/shc -f ./your_config.yaml
如果你之后有进行任何更改your_config.yaml的话,可以执行以下的命令更新setting
helm upgrade community-hoppscotch ./charts/shc -f ./your_config.yaml

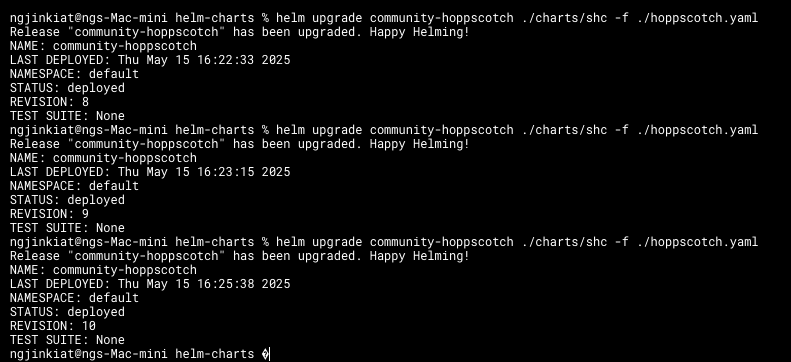
如果你想要删除整个安装的Hoppscotch的话,可以使用以下的命令
helm uninstall community-hoppscotch
8. 安装完成之后就可以进入https://hcbackend.pangzai.win/admin, 然后填写你的email,系统就会email发出登入token给你的。你点击email就能登入到admin panel了。
注意: 第一个email进入admin panel的就是admin,第二个就不是了。
我遇到的问题:我一开始的的设定subpath是关闭的,所以登入到admin panel之后去到setup页面遇到了CORS的问题,我尝试了在ingress当中允许cors,设了之后还是一样无法解决问题,最终我使用了chrome插件来解决。这个setup页面第一次进入设定之后就不会再进入了。如果你开启subpath的话就不会遇到CORS的问题,因为都是用着同样的domain。
允许CORS的chrome插件:https://chromewebstore.google.com/detail/allow-cors-access-control/lhobafahddgcelffkeicbaginigeejlf?hl=en